AngularJS Resource:与 RESTful API 交互

AngularJS HTML HTTP JavaScript 数组

REST(表征性状态传输,Representational State Transfer)是Roy Fielding博士在2000年他的博士论文中提出来的一种软件架构风格。RESTful风格的设计不仅具有更好的可读性(Human Readable),而且易于做缓存以及服务器扩展(scalability)。REST风格体现在URL设计上:

  • 每个URL对应一个资源
  • 对资源的不同操作对应于HTTP的不同方法
  • 资源表现形式(representation)通过AcceptContent-Type指定

AngularJS提供了$resourceService来更方便地与RESTful服务器API进行交互,可以方便地定义一个REST资源,而不必手动所有的声明CRUD方法。

参考文档: https://docs.angularjs.org/api/ngResource/service/$resource

Resource Factory

$resourceService定义在ngResourceModule中,需要在你的HTML中引入这个Module对应的JS,同时在你的APP中添加这样一个依赖:

var app = angular.module('helloApp, ['ngResource']);

然后为资源建立一个Factory:

app.factory('Notes', ['$resource', function($resource) {
    return $resource('/notes/:id');
}]);

当然,你也可以不把$esource的实例放到Factory里,直接在控制器中存起来:var Notes = $resource('/notes/:id)

AngularJS HTTP Service

AJAX AngularJS HTTP JavaScript Promise 链式调用

$httpAngularJS提供的一个核心Service,通过浏览器的XMLHttpRequest或JSONP与服务器进行交互。 这是一个非常常用的Service,类似于jQuery提供的AJAX。与jQuery类似,$http也采用了deferred/promise模式,不同的是Angular的deferred/promise模式是由Angular的$qService来提供的。

在Angular应用中尽量使用$http而不是jQuery函数来进行AJAX请求,因为$http会在响应到达时触发Angular更新视图($digest循环)。 与此同时,$http还可以通过$httpBackend来Mock和单元测试。

$http文档参见: https://docs.angularjs.org/api/ng/service/$http

基本使用

如果你熟悉了jQuery的AJAX操作,那么使用$http只是重新记住几个方法名而已。把done, fail, always换成success, error, finally

$http.get('/someUrl')
    .success(function(data, status, headers, config){
    // GET成功时被回调
    })
    .error(function(data, status, headers, config){
    // GET失败时被回调
    });

$http方法返回的是一个由$qService提供的Promise对象,事实上Promise对象有三个通用方法:then, catch, finally。 上述的successerror$http提供的两个额外的方法。Promise的三个方法参数如下:

then(successCallback, errorCallback, notifyCallback);
catch(errorCallback);
finally(callback, notifyCallback);

Promise方法是可以链式调用的。

配置$httpProvider

$http Service定义在ng Module里,由$httpProvider提供。于是我们可以通过设置$httpProvider来配置$http的行为。比如,给HTTP请求插入一个拦截器:

someModule.config(['$httpProvider', function($httpProvider){
    $httpProvider.interceptors.push(function($q, dependency1, dependency2){
        return {
            request: function(config){
                // 这里可以调整HTTP请求的配置
                return config;
            },
            response: function(response){
                // 这里能拿到响应对象,当然也可以更改它
                return response;
            }
        }
    });
}]);

还可以通过设置$httpProviderdefaults属性来进行请求/响应的转换(transformRequest, transformResponse)、设置请求的HTTP头字段(headers)。

更多信息,请参考$httpProvider文档: https://docs.angularjs.org/api/ng/provider/$httpProvider

AngularJS 表单(ng-form)验证

AngularJS CSS DOM HTML JavaScript MVC 模板 表单 模块化 数据绑定 正则表达式

在HTML中,用户通过input, select, textarea等元素进行输入,我们通常用表单来包装和管理这些控件。客户端表单验证非常重要,可以及时地为用户提供表单验证信息。但客户端表单验证只是为了增强用户体验,服务器端验证仍然是必要的。

AngularJS最大的特点便是数据绑定。利用Angular在客户端脚本中构建MVC框架,Model和View之间可以实现双向绑定。因此AngularJS的表单验证可以做到实时的用户反馈

事实上,正是因为实时的用户反馈这个神奇的特性,我们团队在 http://tianmaying.com 中也继续引入了AngularJS,尽管此时我们对单页应用已经不感兴趣。

一个简单的表单

Angular是模块化的,每个APP都是一个Angular Module。我们知道Module下可以包含这样四种内容:

  • 控制器(controllers),用来完成页面逻辑,不包含DOM操作、资源获取。
  • 服务(services),用来提供资源访问和获取,控制资源的访问,维护数据一致性。
  • 过滤器(filters),用来格式化数据显示,很多第三方插件以提供filter为主,例如angular-moment
  • 语义标签(directives),增强的HTML标签,DOM操作都应当抽象为directive

Angular表单其实是Angular提供的Directive,它有一个别名叫ng-form。是这个Directive实例化了一个FormController来负责表单内的页面逻辑(主要是表单验证)。

<div ng-app>
  <ng-form name=someForm>
    <input name="username" type="text" ng-model="user.username" pattern="^\w{6,18}$">
    <div class="alert alert-danger" ng-show="someForm.username.$error.pattern">
      用户名必须为6-18个字母、数字或下划线
    </div>
  </ng-form>
</div>

ng-model可以把input的值双向地绑定到当前上下文的user.username变量。我们设置了用户名的pattern为6到18位。我们输入用户名时,.alert错误提示便会实时地显示或者隐藏。

这里我们指定了formname属性,form Directive 实例化的FormController就会以someForm命名,并插入到当前$scope。所以在模板中才能够访问userForm变量。另外,Angular的Pattern使用Javascript正则表达式语法,这里\w相当于[a-zA-Z_]

AngularJS 初始化过程

AngularJS DOM HTML JavaScript MVC 模板 模块化 依赖注入 异步

AngularJS属于典型的单页APP框架,现由Google维护,用在了Google的多款产品中。 如果你的项目引入了AngularJS,同时还有不少的jQuery代码,你可能会碰到两者初始化顺序的问题。 本文就来探讨AngularJS APP以及Controller的初始化过程和时机。

Angular APP

一个Angular APP其实就是一个Angular Module,通常可以包含若干Controller、Service以及Directive。甚至不自己定义APP也可以启动一个Angular应用,例如:

<div ng-app>
  <ng-form>...</ng-form>
</div>

在你引入AngularJS之后,div[ng-app]便会在页面载入时启动,其子元素范围内构成一个$scope,可以使用angular标签(又称语义标签,其实就是directive)。通常我们会显示地定义一个Angular APP:

var app = angular.module('helloApp', []); // 第二个参数定义了Module依赖
// 添加controller
app.controller('worldCtrl', ['$scope', function($scope){
    //...
}]);

然后在页面中引用它:

<div ng-app="helloApp">
  <ng-form ng-controller='worldCtrl'>...</ng-form>
</div>

div[ng-app]的子元素中可以使用该app下的所有控制器,控制器可以嵌套,子控制器的$scope直接共享父控制器的$scope中的变量

Angular APP 的启动

同一个页面中可以包含多于一个的APP,但不能嵌套。同一页面中有多于一个APP时AngularJS不会自动帮你启动APP了,你需要手动启动这些APP。例如:

var element = $('#some-div')[0];
angular.bootstrap(element, ['helloApp']);

AngularJS通过依赖注入的方式来实现模块化与封装。在启动APP之前,往往需要注入一些APP所在环境的信息:

这是常见的需求。因为在AngularJS中,尽量不要去操作DOM(除非你在写directive),否则可测试性会严重下降。参见 http://docs.angularjs.cn/guide/controller

var app = angular.module('helloApp'); // 获得之前声明的那个叫helloApp的模块
app.constant('sessionInfo', {
    'currentUser': $('input#current-user').val(),
    'uploadDir':   $('input#upload-dir').val()
});

Accessing the System Clipboard with JavaScript

Chrome DOM Flash HTML Java JavaScript Linux float inline 剪切板

Origin Post: https://brooknovak.wordpress.com/2009/07/28/accessing-the-system-clipboard-with-javascript/

I am developing an API written in JavaScript for a project which requires the ability to copy data to, and retrieve data from, a clipboard within a web browser. A simple/common problem definition – but due to tight browser security, finding a solution is a bit of a nightmare. This article outlines and discusses a number of approaches for implementing a clipboard feature into your JavaScript applications.

The Ideal JavaScript Clipboard Interface

The concept of the “clipboard” is simple; it is essentially a place for storing and retrieving a single unit/piece of cloned data. The code snippet below describes this clipboard concept in terms of a JavaScript interface.

Clipboard = {
    copy : function(data) {
        //... implemention …
    },
     getData : function() {
        // … implementation …
     }
};

A simple concept, a self explanatory interface. However, the description above is vague; it does not state where “the clipboard” resides, nor does it mention if there can be more than one clipboard.

Multiple Clipboards

Unfortunately there can be more than one clipboard present. There is one “System clipboard” present when a user is logged into their profile/account (some strange people might install/configure some features on their OS to support multiple system clipboards). Ideally, all applications should use the system clipboard when copying and pasting so its users can copy and paste between all applications. However this is not always the case. For example, Cygwin uses its own clipboard for Cygwin applications and unless the user explicitly turns on a clipboard integration option, the user cannot copy and paste between Cygwin applications and non-Cygwin applications.

The Web’s Sandbox Environment

Web applications run in a sandbox environment to prevent malicious scripts from infecting a visitor’s computer. The sandbox environment restricts access to system resources, such as the file system, and unfortunately, the system clipboard. Check out this article for one example why the system clipboard is a restricted resource. Fortunately restrictions for accessing the system clipboard can be overcome. There are many approaches for accessing the system clipboard – each approach has its own trade-offs.

Internet Explorer’s clipboardData Object

Microsoft’s Internet Explorer family makes life very easy to access the system clipboard. To set the system clipboard’s text, just use the clipboardData object. Here is an example:

var didSucceed = window.clipboardData.setData('Text', 'text to copy');

To access the system’s clipboard data (in a textual format) you simply invoke:

var clipText = window.clipboardData.getData('Text');

The first time the clipboardData object is accessed IE will prompt the user to allow the script to access the system clipboard (note: if you run the script locally IE does not bother with the confirmation and automatically allows it). IE version 6 and below will not bother asking the users (unless they have some non-default security features set to a “high level”). We cannot assume that users will choose to allow the script to access the system clipboard. If they decline, the clipboardData.setData method returns false. Unfortunately the clipboardData.getData method is vague: as it returns an empty string if the user chooses to decline. This is ambiguous since the system clipboard’s contents could actually be empty! Ideally it would return null. You could either always assume that empty string is a signal for failure to access the clipboard and try use a different method (read on), or you could attempt to verify that it was a failure:

var clipText = window.clipboardData.getData('Text');
if (clipText == “”) { // Could be empty, or failed
    // Verify failure
    if (!window.clipboardData.setData('Text', clipText))
        clipText = null;
}

Note: the verification method will not display two prompts, since the first prompt will be remembered for the session.
常见包管理与构建工具列表

NPM Bower Grunt Makefile Gem Bundle

包管理和构建系统是现代的软件开发团队中必不可少的工具,也是Linux软件系统的常见组织方式。 现代编程语言大多给出了自己专用的包管理和构建系统,那么本文便来总结一下小编用过的那些包管理和构建系统。

JavaScript

服务器端 Javascript 通常使用NPM作为依赖管理工具。

  • 通过NPM提供的npm命令来进行依赖的下载、升级和移除。
  • 通过package.json来定义软件包的元信息、开发依赖(开发或测试需要)、部署依赖(运行时需要)。
  • 依赖递归地存储在node_modules中。
  • 依赖在项目之间是隔离的,全局安装(-g)会使它成为命令行工具而不是全局依赖。

    递归的依赖下载风格使得NPM的缓存及其重要。缓存位于~/.npm下,这里保存这.tgz格式的包文件。

JavaScript 通常使用 Grunt 进行构建。

  • Grunt通过插件来完成任务,每个插件相当于Makefile的一个命令。
  • Grunt任务定义在Gruntfile.js中。
  • NPM提供了众多的Grunt插件,当然你也可以手写。
  • Grunt任务继承了JavaScript的异步特性。

前端 lib

前端 lib 可以通过 Bower 来下载。Bower 不仅可以下载已注册的软件包,还可以下载Github Repo,甚至是一个文件的URL。

  • 通过bower命令进行依赖管理。
  • bower.json定义了软件包的元信息与依赖。
  • 依赖所在路径可以在bower.json中进行设置。
  • Bower只是一个命令行工具,你需要在正确的路径执行Bower命令。

Bower可以灵活地下载各种依赖,但它的缺点也是明显的:未注册的软件包往往包含冗余的非生产环境的代码,有时甚至需要手动构建。

CSS Display 属性与盒模型

CSS Chrome HTML inline inline-block 盒模型 IE

因为HTML流式文档的特性,页面布局往往是新手最为头疼的问题之一。 每个HTML元素都会渲染为一个Box,可分为inline Box和block Box。 根据display属性的不同,Box的呈现方式又有所不同。 本文首先引入CSS盒模型,然后通过不同的display属性分别介绍Box常见的呈现方式。

Box Sizing:元素大小的计算方式

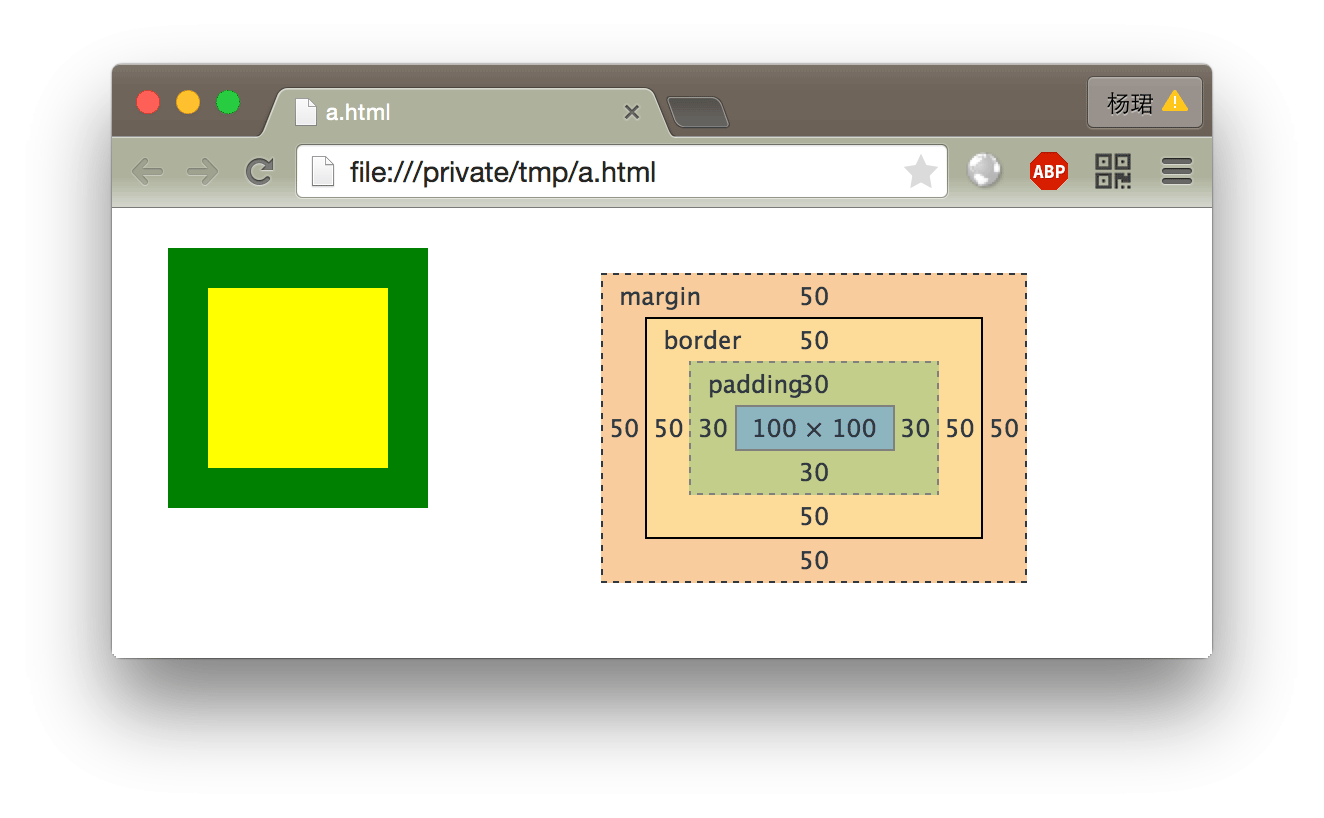
在HTML中,任何HTML元素都会被呈现为一个矩形。该矩形由内容、内边距、边框、外边距构成。举个例子:

<style>
.box-demo{
  width: 100px;
  height: 100px;
  border: 50px solid green;
  padding: 30px;
  margin: 50px;
  background: yellow;
}
</style>
<div class="box-demo"></div>

上述的<div>中,内容、边距与边框如下图所示:

  • 黄色的背景作用于内容内边距构成的矩形,其宽高为160px:宽度100px+两侧的内边距30pxX2;
  • 绿色部分为边框,宽度为50px
  • 与浏览器边框的距离为外边距,宽度为50px

例子中width属性定义的是内容的宽度,不包含边距、边框。然而在IE中width定义的是内容+内边距+边框的宽度。 这是由box-sizing属性来定义的,前者的默认值为content-box',后者的默认值为border-box`。

上一页 下一页